A Picture’s Worth A Thousand Words Dollars
Strong item images are the cornerstone of a good item listing. Online selling is trickier than in-person retail because buyers can’t physically see your item before they purchase it. Your item images need to be killer in order to convince buyers to purchase your product. Luckily, perfecting your item images is easy as 1, 2, 3!
Step 1: Research & Development
The first thing you want to do is to take stock of your current item photos. Evaluate what you already have before you move forward. Here are some things to consider:
- What kind of lighting is used in your photos?
- Do your photos capture many angles of the item?
- Do your photos highlight the positive selling features of your item?
- What is the overall feeling you get when you look at your items?
Next, you should take a look at the photos of your competition. Find items that are similar to yours on Bonanza and any other platform you’re selling on.
- What elements do those photos have that you like?
- How are they similar to your photos?
- How are they different from your photos? What, if anything, do they have that you’re missing?
Step 2: Reshooting your item photos
Now you’ve looked at your current photos and done the research on your competitors. Hopefully you have some photos that are usable, but if not, that’s okay! Your next step will be to reshoot your item photos.
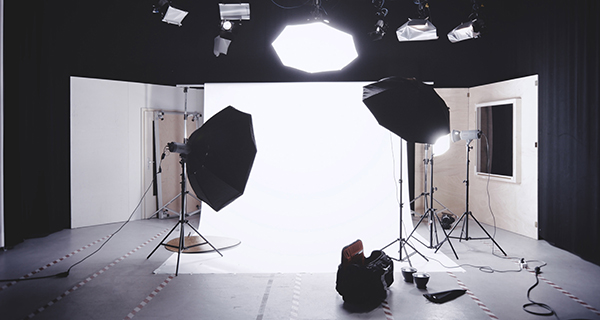
Start by setting up a neutral white background near a light source that is as close to natural as possible – a window or a lamp with a neutral hue lightbulb works perfect for this. You want the light source to be off to the side of the item, or behind the camera, but not behind the item, as this will create backlit photos and result in a dark-looking item.
- If you place the lightsource behind the camera, instead of off to the side, you’ll need to figure out how to operate the camera without casting shadows yourself. You could use a self timer or remote trigger on the camera, or crouch down while operating the camera.
The neutral white background will create a high contrast with your items so that they stand out, and will also make it easier to edit the photo later. The natural light source will brighten up your items while minimizing undesirable reflections or glare that a lamp or flash can cause. It will also present the items in their most true-to-life colors.
A solid bet is to use a sturdy piece of white paper, wallpaper, or a sheet, and set it up so that it curves from a flat horizontal surface (table, chair, etc.), up to a flat vertical surface (wall, bookcase, etc.).
Like this:
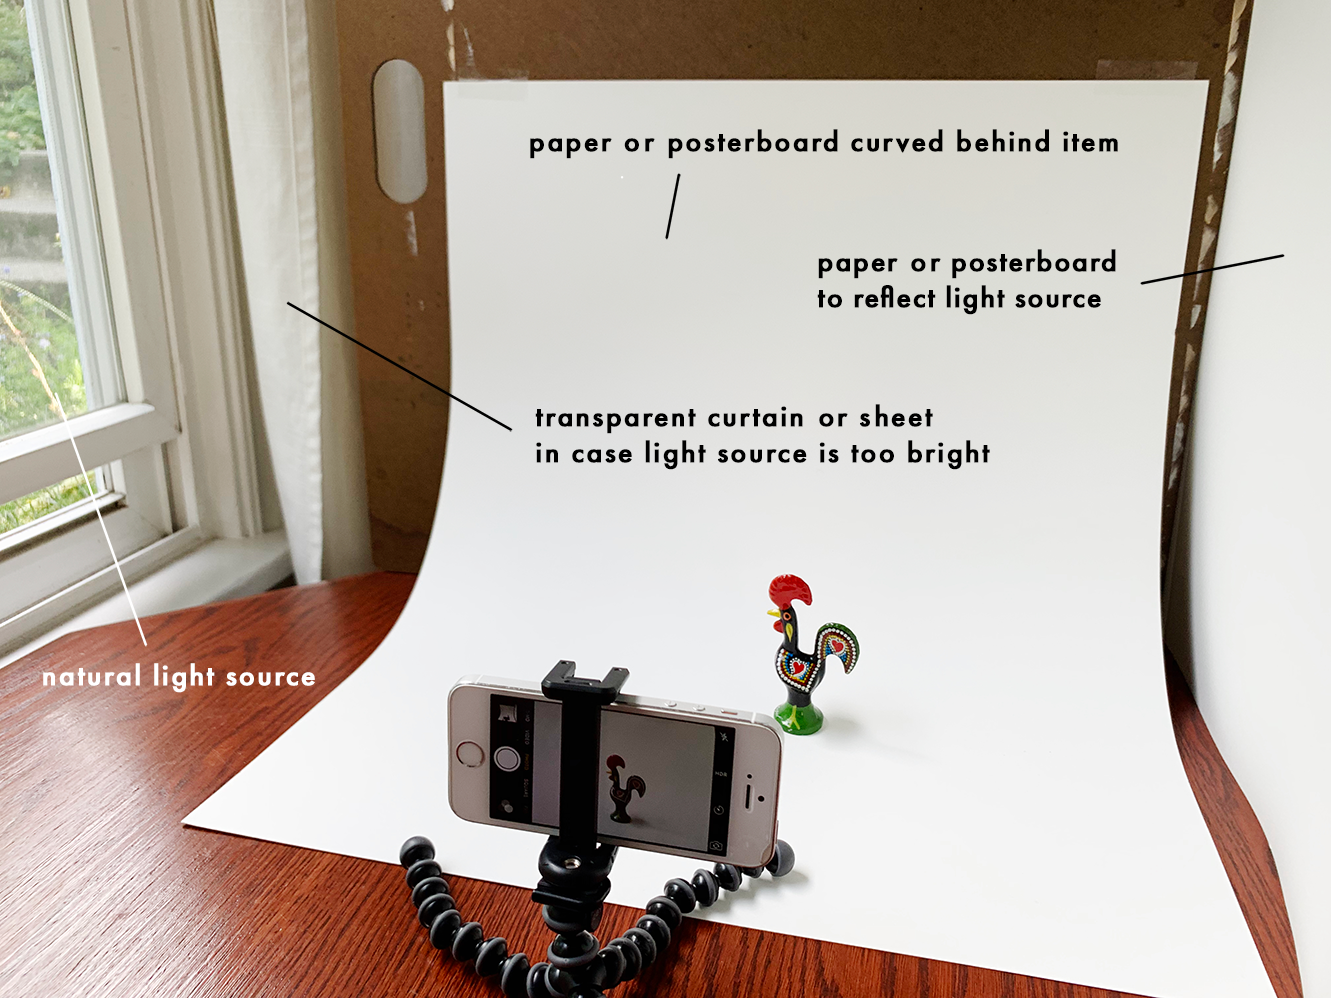
Why the curve in the backing? The curve ensures that there aren’t any hard edges in the shot to distract from your item, and it also helps reflect light back onto your item in a natural manner.
- If your items are larger, like furniture or clothing on a human model, you can use wallpaper or a sheet to curve between the floor and the wall.
Next, experiment with your natural light source. For instance, if you’re using a window, you may find that an overcast day produces more neutral lightning that works better than bright sun. Alternatively, you can hang a white sheet or curtain over the light source (see example above).
An additional piece of sturdy white paper or another white sheet can come in very handy as a reflector. Place the reflector on the opposite side of your item from the light source to brighten that side of the item as needed.
It is typically best to use a tripod with your camera. A tripod allows you to use longer shutter speeds with a traditional camera, resulting in more light being gathered by the camera and crisper shots. Even if you’re shooting with a smart phone, a tripod will reduce shakiness that could cause blur in the image, and it will also help you keep the composition of your shots consistent as you rotate or switch items.
Some additional tips for shooting with smart phones:
- Avoid using your phone’s zoom feature – it can cause graininess and other quality issues.
- Avoid using the front-facing selfie camera, as this is typically lower quality than the rear-facing camera.
- Turn off your flash. Make adjustments to your natural light source as needed instead.
Remember, customers decide whether or not to purchase your item based on what they can see, so make sure your photos are a complete representation of the item. Providing plenty of images that capture all aspects of your item will increase your chances of making a sale. Up-close photos of item details, unique photo angles, and examples of your item in use can also be refreshing to buyers.
Step 3: Editing your items
Once you’ve got fresh photos, you’re ready to edit and touch them up!
Here are a few key terms to keep in mind when editing:
- Brightness: the overall lightness or darkness of the image
- Contrast: the amount of difference between the brightest and darkest areas of the image
- Saturation: the intensity of colors – the higher the saturation, the more vivid color becomes
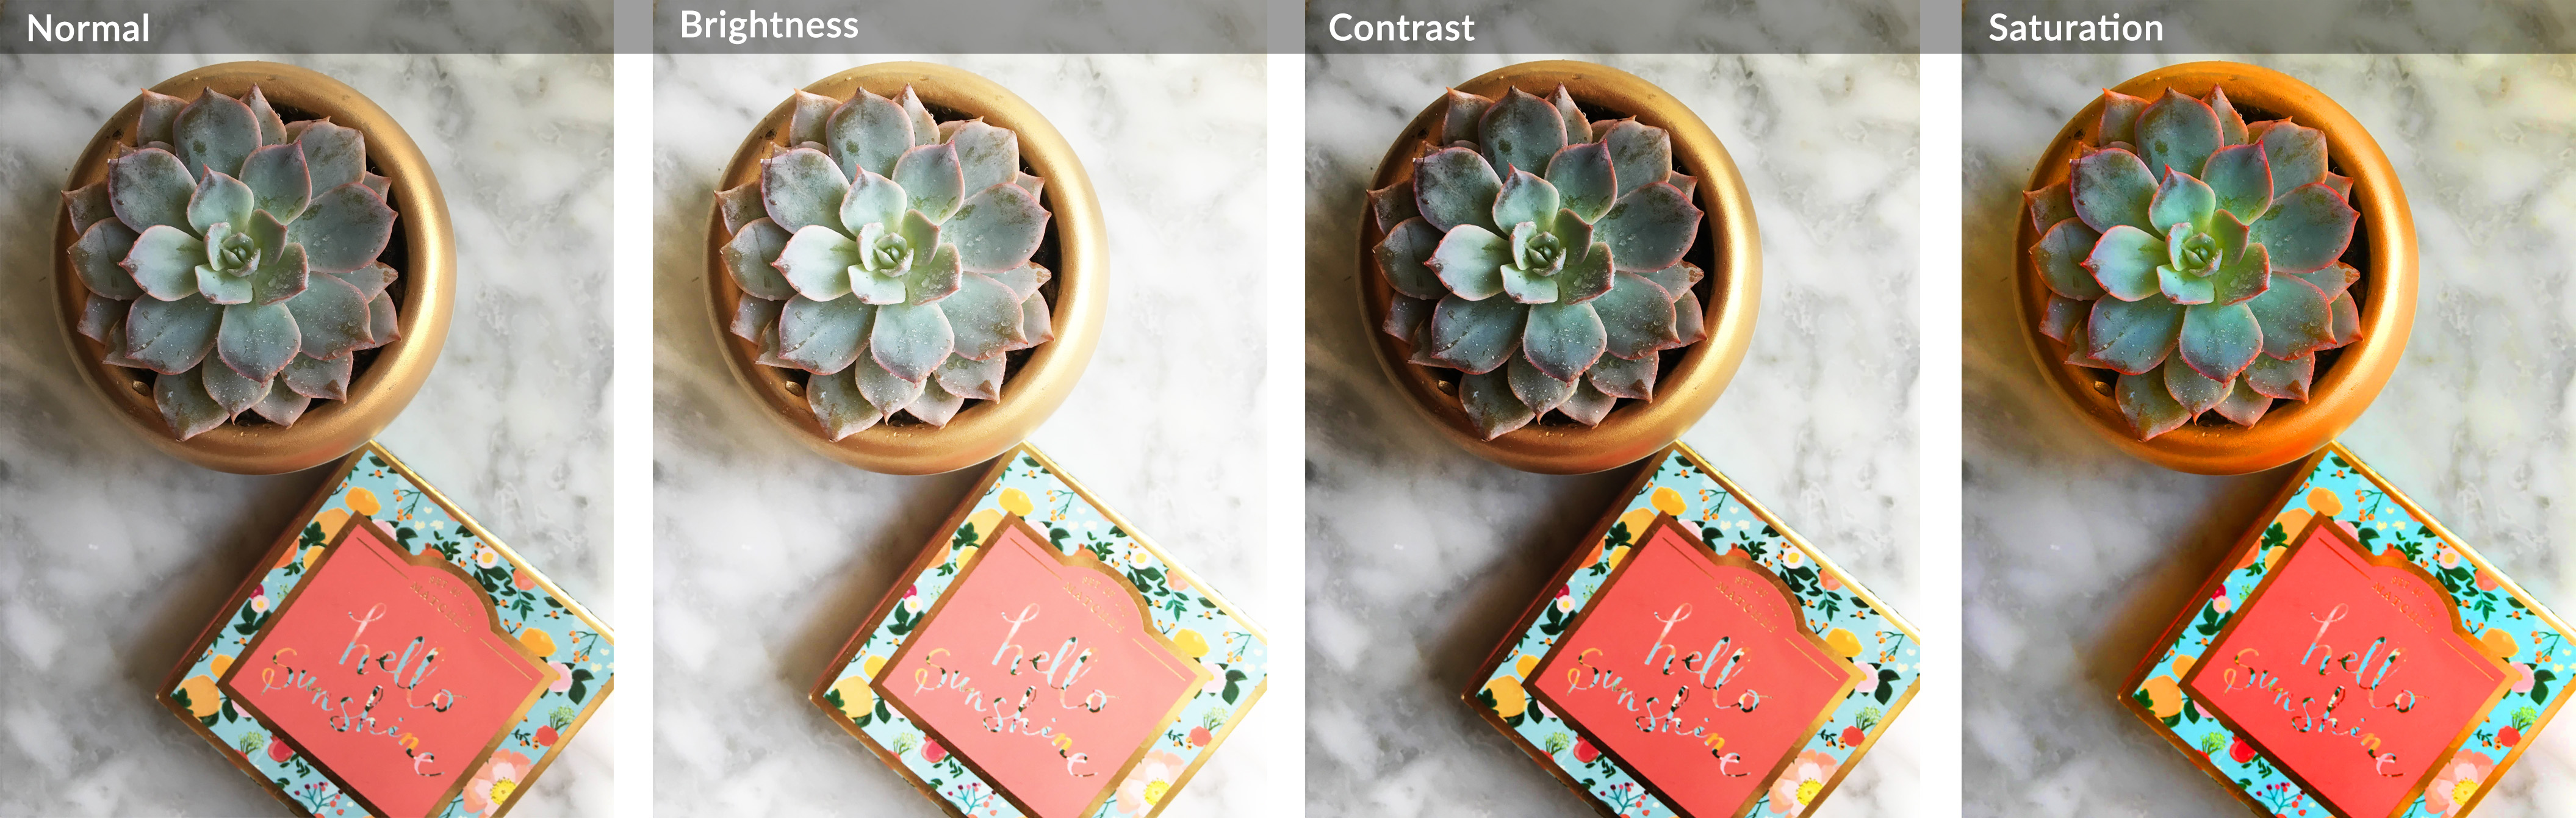
You want your product images to be bright and eye-catching, but they also need to convey an accurate perception of the product to shoppers. For instance, a customer might be disappointed if a shirt arrives and it is not as bright blue as your edited image suggested.
Compare your images pre- and post- editing. If you notice that you’re having to, say, brighten most of your images, adjust your photography setup to convey more brightness next time. This will save you time spent editing in the long run, and also help create a feeling of consistency for your product photos.
Pro tip for social media users: One technique to help build a loyal fanbase on social media is to create a defining ‘mood’ for your images. For instance, some brands will edit their photos to have a blue-ish, cooler temperature to them, so that when you view their feed on Instagram, there is an overall feeling of coherence that brings to mind words like ‘chill’ and ‘sleek’. If you’re interested in learning more about maximizing the use of color in your product photos, check out this guest blog from Instasize.
If you have thousands of images to update, don’t feel overwhelmed. Start with your best-selling items, most viewed items, or those items you think could use a little love and work your way through as you have time.
Editing Software
Whether you prefer to edit item images on desktop or mobile, there’s lots of great options out there. Many offer free or trial versions, so you can experiment and perfect your style without breaking the bank. Start by trying out any free photo software that might have come bundled with your computer or camera, as you might find that’s all you need. If not, here are some of our favorites:
For desktop:

Pixlr is a solid option for desktop users who are looking for a more affordable, simple alternative to Photoshop. It can be used for free by visiting their webpage web page on desktop, and they also offer a ‘Pro’ paid version. It provides many standard photo editing features in a sleek web interface.
Photoshop is a comprehensive choice as long as you don’t mind a bit of a learning curve. It is capable of just about anything you can imagine, from light and color adjustments to background removal, alterations, and beyond. There are many tutorials available online if you’d like to learn a particular editing technique. It can be obtained as part of Adobe’s Photography subscription plan for $9.99/month at the time of this writing. The plan also comes with Lightroom, which is handy for editing and managing large quantities of photos.
For mobile:

Instasize is a great choice for editing images on the go, especially if you intend to also use the images on social media. Not only does it offer a large array of photo editing options, it can automatically re-size your image’s dimensions to precisely fit any social media platform. It has a wealth of presets and photo filters for those striving to convey a particular mood or color theme, and they offer both free and premium versions.

2 other capable editing apps for mobile are VSCO and Darkroom. It’s also worth noting that the mobile version of Photoshop, Photoshop Express, is free. It’s simpler and easier to learn than the desktop version, but still useful for general photo editing.
Experiment and find what works best for you!
Pulling it all together
Now that you’ve got all the tools necessary take your item photos to the next level, let’s look at an example.
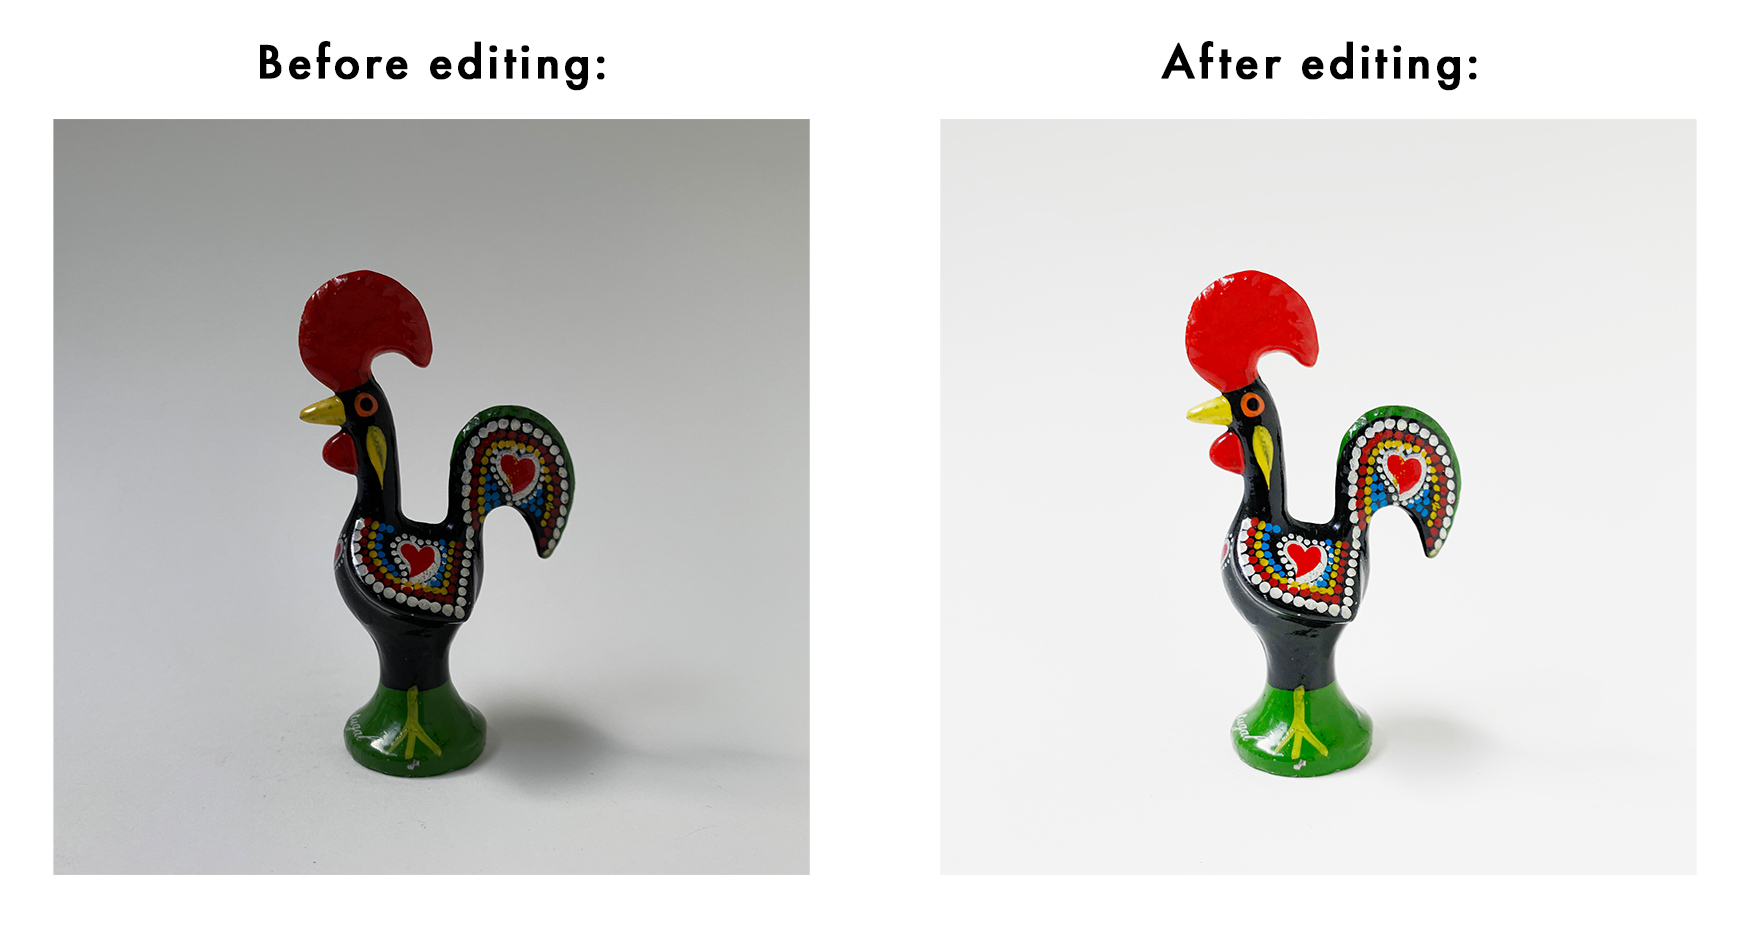
Here, the image was fairly dark before editing, but at least we had a nice clean white background from our photo booth setup in the example earlier. Boosting the Brightness and Contrast during editing helped resolve the issue and resulted in a useable image. Increasing the brightness of the light source during the photoshoot might be an easier way around this in the long run. Experiment until you find a setup you’re happy with, and you’ll be breezing through item photos in no time.

Editing an image in the Darkroom mobile app
We hope these tips help you take your product images to the next level. Have fun out there!
See more Holiday Workshop topics
|